本文为 python数据结构与算法的读书笔记,主要介绍二叉树的两种python实现方式。
定义
- 有一个根节点;
- 除了根节点外,其他每个节点都与其唯一的父节点相连;
- 从根节点到其他每个节点都有且仅有一条路径;
- 如果每个节点最多有两个子节点,就称其为二叉树。
一般要实现下面的操作:
- 创建一个二叉树:
BinaryTree();
- 返回当前节点的左子节点所对应的二叉树:
get_left_child();
- 返回当前节点的右子节点所对应的二叉树:
get_right_child();
- 在当前节点存储参数val中的对象:
set_root_val();
- 返回当前节点存储的对象:
get_root_val();
- 新建一个二叉树,并将其作为当前节点的左子节点:
insert_left(val);
- 新建一颗二叉树,并将其作为当前节点的右子节点:
insert_right(val);
实现
实现树的关键在于选择内部存储技巧,在Python中,我们选用了两种实现方式,分别为:列表之列表,节点与引用。
列表之列表
这种方式我们主要使用列表作为树的存储方法,将根节点作为列表中的第一个元素的值,第二个元素作为左子树的列表,第三个元素作为右子树的列表。如下图:

上图用python列表表示为:
1
2
3
4
5
6
7
8
9
| my_tree = [a,
[b,
[d,
[h, [], []]],
[e, [], []]],
[c,
[f, [], []],
[g, [], []]
]]
|
可以通过标准的列表访问方式访问子树,树的根节点是my_tree[0],左子树是my_tree[1],右子树是my_tree[2]。上面关于列表的结果和树的结构很类似,并且是递归的。由一个根节点和两个空列表表示的是一个叶子节点。这种表示方法不仅可以用在表示二叉树上,还可以推广到多子树的情况。
下面提供一些方法,可以便利的将上面这种列表作为树来使用。
1
2
3
4
5
6
7
8
9
10
11
12
13
14
15
16
17
18
19
20
21
22
23
24
25
26
27
28
29
30
31
32
33
34
35
36
37
38
39
40
41
42
43
44
45
46
47
| def BinaryTree(r):
"""
创建二叉树
"""
return [r, [], []]
def insert_left(root, new_branch):
"""
插入左子树
"""
t = root.pop(1)
if len(t) > 1:
root.insert(1, [new_branch, t, []])
else:
root.insert(1, [new_brach, [], []])
return root
def insert_right(root, new_branch):
"""
插入右子树
"""
t = root.pop(2)
if len(t) > 1:
root.insert(2, [new_branch, [], t])
else:
root.insert(2, [new_branch, [], []])
return root
def get_root_val(root):
return root[0]
def set_root_val(root, new_val):
root[0] = new_val
def get_left_child(root):
return root[1]
def get_right_child(root):
return root[2]
|
节点与引用
树在python中第二种实现方式是利用节点与引用进行创建。我们将定义一个类,其中有根节点和左右子树的属性。采用节点与引用表示法,可以将树想象成如下图所示的结构:
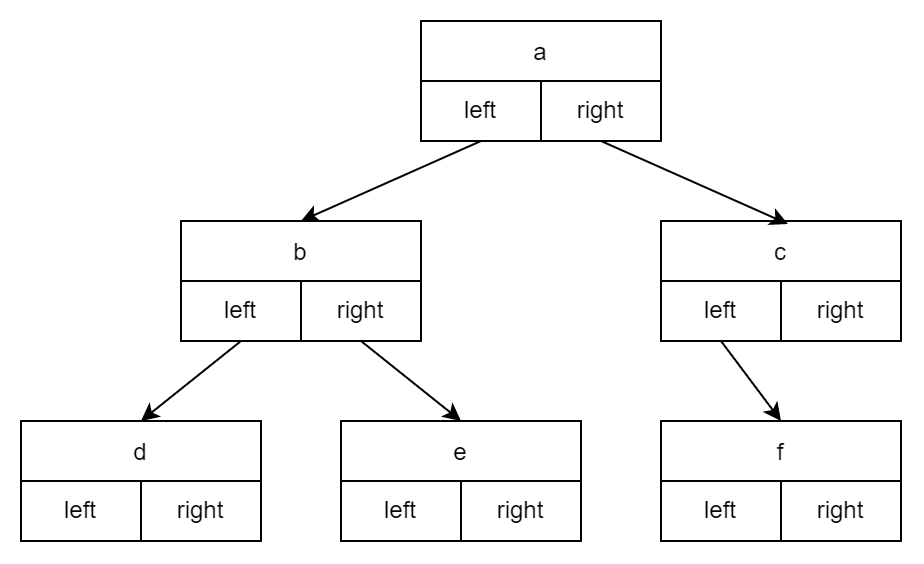
首先得定义一个简单的类,节点与引用的要点是,属性left和right指向BinaryTree类的其他实例。具体来说,就是在向树中插入新的左子树时,我们会创建另一个BinaryTree实例,并将根节点的self.left_child改为指向新树。
1
2
3
4
5
6
7
8
9
10
11
12
13
14
15
16
17
18
19
20
21
22
23
24
25
26
27
28
29
30
31
32
33
34
35
36
37
38
39
40
| class BinaryTree:
def __init__(self, root_obj):
self.key = root_obj
self.left_child = None
self.right_child = None
def insert_left(self, new_node):
"""
插入左子树
"""
if self.left_child is None:
self.left_child = BinaryTree(new_node)
else:
t = BinaryTree(new_node)
t.left_child = self.left_child
self.left_child = t
def insert_right(self, new_node):
"""
插入右子树
"""
if self.right_child is None:
self.right_child = BinaryTree(new_node)
else:
t = BinaryTree(new_node)
t.right_child = self.right_child
self.right_child = t
def get_right_child(self):
return self.right_child
def get_left_child(self):
return self.left_child
def set_root_val(self, obj):
self.key = obj
def get_root_val(self):
return self.key
|
应用
解析树
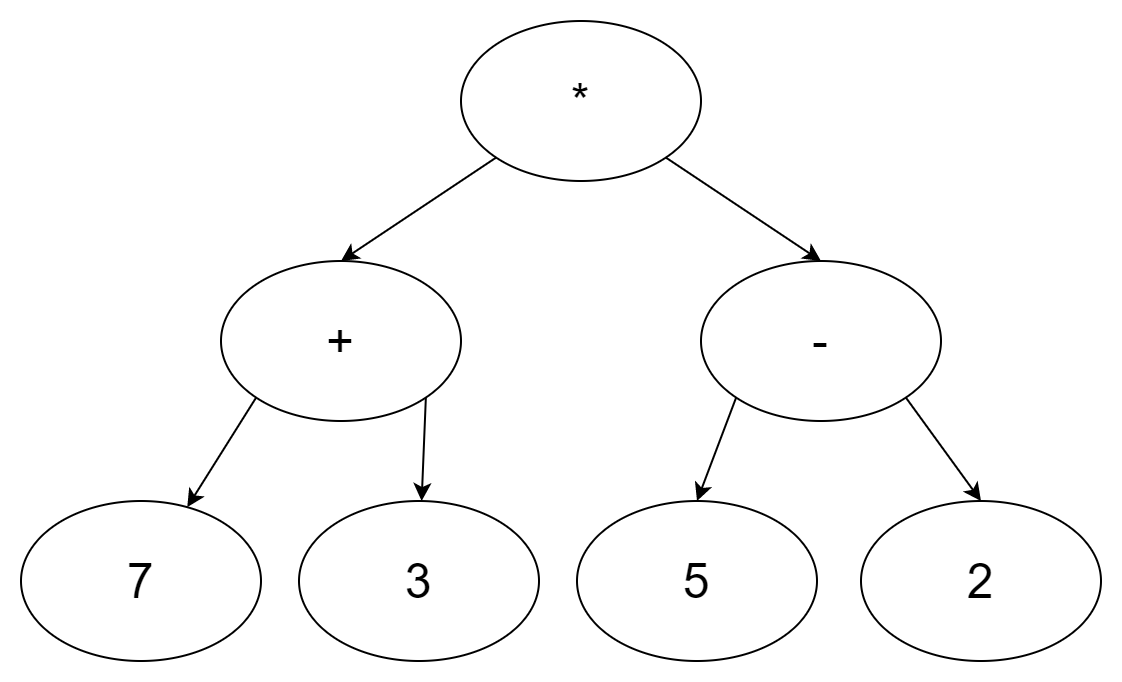
我们用一个数学表达式来对解析树的构建进行说明。数学表达式:$ ((7 + 3) * (5 - 2))$ 。这是完全括号表达式。利用树的层次结构,再计算完子树的表达式后,只需要一个节点代替整颗子树即可。整个数学表达式用解析树表示为下图:
构建解析树的第一步是将表达式拆分为标记列表。需要考虑4种标记:左括号、右括号、运算符合操作数。左括号代表起点,所以应该创建一棵对应表达式的新树。反之遇到右括号意味着到达该表达式的终点。操作数即是叶子节点,也是其运算符的子节点。每个运算符都有左右节点。
我们可以定以下四条规则:
- 如果当前标记是(,就为当前节点添加一个左子节点,并下沉至该子节点;
- 如果当前标记在 +,-,/,*中,就将当前节点的值设置为当前标记对应的运算符;为当前节点添加一个右子节点,并下沉至该子节点;
- 如果当前标记是数字,就将当前节点的值设置为这个数并返回至父节点;
- 如果当前标记是),就跳到当前节点的父节点。
这个例子中,在构建解析树时,需要追踪当前节点机器父节点。我们可以通过遍历这棵树时使用栈记录父节点,每当要下沉至当前接地那的子节点时,先将当前节点压到栈中。当要返回到当前节点的父节点时,就将父节点从栈中弹出来。下面代码展示了构建的解析树:
1
2
3
4
5
6
7
8
9
10
11
12
13
14
15
16
17
18
19
20
21
22
23
24
25
26
27
28
29
30
31
32
| from pythonds.basic import Stack
from pythonds.trees import BinaryTree
def build_parse_tree(fpexp):
fplist = fpexp.split(' ')
pstack = Stack()
etree = BinaryTree(' ')
pstack.push(etree)
current_tree = etree
for i in fplist:
if i == "(":
current_tree.insertLeft(' ')
pstack.push(current_tree)
current_tree = current_tree.getLeftChild()
elif i not in '+-*/)':
current_tree.setRootVal(eval(i))
parent = pstack.pop()
current_tree = parent
elif i in '+-*/':
current_tree.setRootVal(i)
current_tree.insertRight(' ')
pstack.push(current_tree)
elif i == ')':
current_tree = pstack.pop()
else:
raise ValueError("Unknown Operator: " + i)
return etree
|